Friday, October 31, 2008
New Art
Tuesday, October 28, 2008
Terrorific Tuesday
This month has flown by as fast as a witch on her broom! Can you believe that Halloween is almost here?? Well, unfortunately this is the last Terrorific Tuesday of the year, so whip out that glue gun and scissors and get to work on one of these great ideas that will be sure to delight ghosts and goblins of all ages!
Spooky Jewels Katie Hacker strings this red and black set using a Fresh resin pendant, polka dots, and metal skulls.
Fangtastic figurines Retta a.k.a. Attercat breaks out the polymer clay and whips up some glow-in-the-dark figurines.
Cool canister Serena the Crafty Mom revamps a bargain bin canister into an awesome Halloween decoration!
Gothic Pink Melissa J. Lee explores the spooky side of one of her favorite pastel colors.
"Eye"gor pin cushion Kiki of Kiki's Craft World knits up this eye-catching pin cushion bracelet.
Stamped paper coffin Kate Pullen, the Rubber Stamping Guide at about.com folds and stamps up this little coffin box that Dracula would envy!
Fun party food ideas Amy at Living Locurto threw a Halloween party and came up with tons of great ideas for the food table including this adorable witch cake!
Double the goodness from Margot! The Impatient Crafter™’s final Terrorific Tuesday offering is a two part story of friendship, Goth Style. Here are links to see Morticia Invites Miss Havisham to Tea and The Invitation.
Spiderman pendant (but not the Spiderman you're thinking) Kim Ripley a.k.a. Stoopidgerl pours up a glittery sweet skull and crossbones resin necklace.
Quick & easy polka dot treat cups Alexa Westerfield a.k.a. Swelldesigner shows you how to make quick and easy Halloween treat cups sure to wow your guests!
3 brand new Halloween jewelry projects! Tammy Powley, the Jewelry Guide at About.com does an all-nighter (almost) as she pushes for a few more Halloween jewelry projects, including a super cool sterling silver spider, a glass framed mixed-media Halloween-themed pendant, and to top it off, a silver headless skeleton charm.
Fast & Fun Halloween Boa Sarah E. White, About.com's Knitting Guide knits up this super cute boa perfect for those chilly fall nights!
Dia De Los Muertos Cigar Box Shrine Kathy Cano-Murillo a.k.a. The Crafty Chica honors the Day of the Dead with this beautiful shrine.
Happy Haunting Greeting Card Phyllis Dobbs treats us once again with this cute Halloween card, perfect for all your favorite goblins!
Gypsy Traditions Lorilyn Hurley of the Dream Life shares a touching story of her family's love for Halloween & their passion for playing dress up at their annual party!
More spooky pendants Rebecca Hull for HHH Enterprises does it again with these ultra fabulous pendants!
Boo Bucket Michelle McGee crafts up a spooky and scary bucket that will leave goose bumps on all your guests!
Vintage Postcard Banner
Kris Tuey aka: the Collage Contessa has made it official. Now you know exactly what time it is when you walk into her house. It's HALLOWEEN time! This vintage project using fun Halloween postcards is so simple you can even entice the kids to help as well!
Fall Wall Hanging
Kim of Sew Sugary Sweet stitches this wonderful and whimsical wall hanging for her Fall Swap partner.
Monday, October 27, 2008
Vintage Halloween Banner - Terrorific Tuesday
This is a great design to use for Thanksgiving, Christmas, Valentines, even July 4th! Have fun creating and remember to let me know if you make something. I wanna see.
Supplies:
3 pieces Orange 8 1/2 x 11" cardstock
9 Vintage Halloween postcards or something similar, cut to 3 1/2 x 5" size
Background stamp (mine is like architecture iron work)
Black stazon ink pad
Embroidery floss (I used orange and dark brown)
Decorative Scissors (I used a 'victorian' style)
5 ft Ribbon (mine has pumpkins on it)
Chipboard letters, stickers or rubons spelling HALLOWEEN
Glitter glue (I used clear)
Poker tool or use a bigger needle
Needle & Scissors
Glue & Exacto Knife
1. Take orange cardstock, fold and rip into 4 even pieces. Cut the 2 long sides with the decorative scissors. I cut off just enough to make the decorative edge but not enough to cut off width.
2. Using the background stamp, stamp with the black ink, onto the orange cardstock pieces. Ink the edges of the stamped pieces as well.
3. Cut out your postcards to a 3 1/2 x 5" size and glue vertically on the stamped cardstock. I put my glue about 1" in on each side of the postcard. Don't glue all the way to the edges. It makes the next step harder.
4. Take your poking tool or bigger needle and evenly spoke holes around the edge of the postcard (mine are almost 1/2" apart.)
5. Thread a larger needle with embroidery thread (I did not split mine, I used all 6 strands.) Stitch around the entire postcard. This is so simple, my 9 yr old dd was able to help me.
6. Using the exacto knife, cut about 1/2" down on the postcard section of your pieces, a 1/2" vertical slit on the left and right side. This will be so you can thread your ribbon through for your hanger.
7. Thread your ribbon through so the middle of the ribbon is behind the postcard. Make sure you have about 5+ inches extra on each end of your banner.
8. Adhere the chipboard (or sticker/rubons) to the bottom left corner of the postcards, spelling out Halloween.
9. Using the glitter glue, choose parts of your postcards to highlight with glitter.
10. Hang up wherever you desire!
Unlimited Money - Creative Therapy
Journaling reads:
World Class Education: Sometimes I wish I had all the money I needed to take my children around the world. To travel to all sorts of countries as part of our homeschooling. I’d like to show them the world instead of just reading about it all..
This catalyst was in my head for awhile. Being that we homeschool our kids, I’ve always wanted to take them around the world. To help them experience life first hand instead of out of a book. To show them India, France, Scotland, Fiji, Argentina, Russia and Australia. To see the Eiffel Tower, Stone Henge, the Panama Canal. I want them to surf in Hawaii, float in a boat in Venice, ski in Switzerland. To experience the cultures, the exquisite foods and gorgeous architecture. I want them to learn languages, help others who are less fortunate and find their purpose in life. I hope someday we might be able to expand their horizons and show them the world.
(this is a page in my altered journal I've been working on periodically.)
Take a moment and go look at this week's catalyst examples. All are different, interesting, some stunning. I'm just in awe of everyone else's talents!
Thursday, October 23, 2008
Random Post
I received a pretty inspiring thing in the mail that makes me want a clean art room and plenty of time to myself. An order from Dick Blick. Can you tell I'll be busy this fall? I can already feel the creative juices flowing!
I'm extremely excited! I received a custom order the other day on my Etsy. Remember this piece I made for my dd's room?
A lady order one with her daughter as the subject. I can't wait to see how it comes out!
Wednesday, October 22, 2008
Etsy Sale 10/22-11/10
Etsy Buy Handmade collagecontessa |
Fall, Kansas City & New Art (freebie too!)
I'm so enjoying fall. Is it fall yet where you live? Today I took the pup pup out to do her business and she ran to and fro kicking up leaves (Kind of like the speedster on Heroes! lol). I could see her tongue hanging out in joy as she ran through the yard. I think she likes fall as well. Our yard is certainly showing signs of autumn. Leaves are changing and littering the yard in an array of colors. The small trees and vines that grow along our fencing are looking more bare and dropping their burrs and those pokey little balls the trees have. All the berries are drying up and the little flowers are almost all gone. Pup pup always comes inside with mini-burrs embedded in her fur and she has to endure a good brushing.
This weekend we headed to downtown Kansas City to watch DH run his first half marathon. in 6 years. (He's been training for his marathon coming up in January in Disneyworld!) My camera decided not to work at the exact moment he came across the line so I don't have that picture but here's an 'after' pic. He looks pretty good for running 13.1 miles. I would be dead at 1 mile. lol
What a sea of people. And this is just the runners waiting in line to get their fruit, juice, yogurt and cookies. You should have seen all the spectators!
Pic of dd watching for DH.
I also took a few pics of buildings in the surrounding area. I really liked the big yellow sign. If I had had more time I would have driven around to find more signs. The old metal lettering delights me.
My father works at an architectural firm right next to where the marathon began and ended ,so we went to see his office. I love all the little design elements, lamps and structures they have inside. The outside metal pieces on the buillding are copper tin-core. On the left (behind the yellowish tree) they have a built in grill for when they have office parties.
On Sunday we celebrated the extended family's 3 October birthdays. Mine, mom and SIL's birthdays. I received lovely gifts of 2 fall scarves (one dd has already stolen although I plan to steal it back.), a yummy fall candle, a magnetic towel rack for the kitchen -Love it- and kitchen towels. Everything was my style and I love them. I was a bit poor so I made gifts for both of them. They seemed to enjoy them, I hope.
Here are some of the family pics from our party. (Do you remember my post about my father, the coffee connoisseur, and how he roasts and grinds his own beans, AND collects vacuum coffee pots? You can see some of his coffee pot collection in the background of some of these pictures.)
(These are pics from last fall; looking into my neighbor's yard. Our colors aren't quite to this gorgeousness yet. Soon though.)
Last but not least... A few weeks ago I picked up pretty leaves from my back yard and couldn't resist scanning them in and making a sheet I can print and use in art. I thought I'd share them with you. Just click on them to go to my Flickr account. There you can click on 'All Sizes' above the pic and then do the right click-save to computer thing and enjoy! If you make art with them, let me know. Feel free to share them on your blog, just link to my blog please. Have fun creating!
Thursday, October 16, 2008
New Winners & New Magazine!
1 - Altered Book - McMuffy
2 - Poe Bookmark w/kit for making more - Lucy
3 - 20 pc set of Sticker sheets - Sherry Goodloe
4 - Orange 'Love' piece - Kris Hubick
5 - Mix of fabrics & Ribbons - Kristin M
6 - 5+ stamps from my drawer purge - Bunny
(The GC prize to the AlteredArts store had to be postponed until they straighten out my order. I'll have another giveaway soon!)
If you're still looking to win something, Kris Hubick is having a scrumptious giveaway of her own! GO HERE to enter, but save some for me! lol
-----------------------------------------------
A month or so ago I was asked to share some of my journal & altered book pages in an indie publication magazine called Page By Page. I was surprised and honored. It's a wonderful magazine of inspiration for visual journals. The articles, how-tos, even a feature on Roben-Marie Smith this month (who is frequently found in Somerset Studio) is such a fabulous combination of inspiration and information. I haven't been able to put down my copy since it came! So, I just wanted to share this magazine with you, if you're looking for something new and interesting, this is a great read.
Tuesday, October 14, 2008
Terrorific Tuesday
Rebecca Hull at HHH Enterprises crafts up some spooky "Itsy Bitsy Spider" & "Murder at Midnight" Pendants that are absolutely terrorific! Be inspired to make your own pendant using your favorite Halloween image.
Lori-Lyn Hurley of the Dream Life makes a quick and easy craft by turning plain jars into spooky accents!
Tammy Powley, the jewelry guide at about.com, wears these fun spider earrings every year around this time. Seed beads, a few crystals, and craft wire are all you need to make a pair of your own.
Phyllis Dobbs haunts us with an adorable gift bag using Brenda Pinnick's Sizzix dies.
Kate Pullen, the Rubber Stamping guide at about.com, does a Halloween spin on a fun & classic craft – the paper chain!
Sarah E. White, the knitting guide at about.com, shares with us knitted jack-o-lantern bag that’s a real treat!
Braaaiiinnssss!!!! Kiki of Kiki's Craft World crafts up a cute brain slug hair accessory!
Marice Rodriguez gets carded with this totally cute Jeepers Creepers card!
Margot Potter, The Impatient Crafter™,offers this seasonally appropo and simple to recreate 'Runs with Scissors' charm bracelet. For those who know the hazards of crafting far too well and yet continue to play with sharp objects, toxic substances and messy paints and inks, this one's for you!
Alexa Westerfield a.k.a. Swelldesigner shows you how to become a living masterpiece. She creates a costume from an artist canvas.
Kris Tuey a.k.a. the Collage Contessa gets her spookiness on with a Skeleton House Frame and oodles of glitter!
Brenda Pinnick's three happy little ghosts have figured out how to spell "Boo!" . Her Halloween greeting card is made with her own clear stamp set available from Sizzix and her papers, available on QVC.
Melissa J. Lee gets bit by a passion for vampires with this simple fanged Bite Me necklace.
If you'd like to participate next week, please read more about it here. It's open to all bloggers out there who want to join in!
Monday, October 13, 2008
Halloween Project - Skeleton House
I found the cutest paper mache' house shape at Michaels (it's about 8" tall) last week. I could just see it as a haunted house! My friend Barb mailed me the adorable skeleton and my new favorite tool (the glue pen) and I put them to good use here. The circles on the sides and around the diamond paper, I glittered with the pen and a jar of shinies. The pretty purple paper (YES Rhonda, its purple, are you shocked?) is wrapping paper from Borders that you can buy in sheets. My dd frowned at me when I pulled out the white fencing. She said 'that's the fencing you won't let me use outside for my fairy houses!' Yes, I'm that mean a mother. I've been hoarding it. But just to show there were no hard feelings, she made the pumpkin for me to add to my house. I consider it the perfect touch.
What's your favorite part of Halloween?
I love carving the pumpkins, cooking the seeds and eating pumpkin candies too.
P.S. I'll be announcing final winners of my birthday party giveaways and packing items and shipping. I still need a few addresses for mailing. If I don't have yours, I'll be contacting you. Thanks to all those who played along and made my birthday so fun!
Wednesday, October 08, 2008
Married With Children-Creative Therapy
This week's Creative Therapy prompt was "What’s a decision you made that ended up determining the direction of your life? (or at least it had a strong effect on how your life turned out.)"
I think the biggest decision I made that impacted my life was made when I had no idea what I was doing. At 18, I married a boy from high school. A friend, and boyfriend. Someone who had been around my family since I was 13. I thought I loved him, and nothing else mattered. It turned out to be one of the best decisions of my life. Sure, I had no business getting married so young but God used my young life decision and turned it into his plan. We had the hardest time in the first couple years, probably because we’re first borns and stubborn and had no clue what we were doing. But we’ve weathered many a marriage storm and just celebrated 20 years of marriage. I remember some of my teenage years. I wanted to go to college, travel the world, speak many languages, be a translator at the UN. But I chose to be with my sweetheart. I did return to college and probably could go for more but that’s in the future. In the meantime, we’re raising our girls, homeschooling them, trying to figure out and do what God has in mind for us. I’ll brush up on my spanish, my daughter is teaching me french and we’ll travel someday. I do not regret my decision in the least.
Technique Highlight:
This is made on mat board. I plan to use it as the cover for a ‘Married With Children’ journal about fun stuff that goes on in my life. I want to celebrate my marriage and kids. Background is over painted, with acrylics, oil pastels, stenciled with cheesecloth, gel pens, ink, glitter, paints, stickers. I painted a matchbox, painted and attached a wooden heart inside. Strung book binding string through eyelet holes inside. Used a rusty U-hook for the matchbox pull. The painted cheesecloth on top of the box is leftover from a previous project. Images are by AlteredPages.com.
Don't forget you can participate in the weekly challenges and win prizes! This week's prize is a kit from Tarisota Creations. It's very yum and one lucky person will receive it!
Tuesday, October 07, 2008
Terrorific Tuesday
Eye of Newt Necklace Melissa J. Lee treats us to this stunning necklace filled to the brim with lots of texture and gothic appeal!
Halloween Knitting Patterns Sarah E. White whips up some insanely fun knitting patterns on her About.com Knitting Blog. Learn how to knit a ghost, pumpkin hat, Halloween bag and more!
Spooky Googly Eyed Crafts Alexa Westerfield a.k.a. Swelldesigner creates 6 projects which includes a frame, pumpkin, and fashion accessories with her crafty stash of googly eyes.
Trick-or-Treat Candy Pot Phyllis Dobbs paints up an adorable pot that will make all the little ghosts and goblins smile.
Owl & Witch Halloween Cards Brenda Pinnick uses her Sizzix dies to craft these totally spooky cards. So swell!
Franky Halloween Card Marice Rodriguez crafts up this adorable glittery and colorful Halloween concoction on her Flickr page.
Resin Halloween Cabochons Tammy Powley's experiment with resin turns out to be a success! Check out her adorable cabochons and ideas for using them on her About.com Jewelry Making Blog.
Pumpkins & Swirls Halloween Candle Kate Pullen shows you how to make this beautifully-inspired candle using simple rubber stamping techniques on her About.com Rubber Stamping Blog.
Crystal Web Necklace Margot Potter a.k.a. The Impatient Crafter wins the webby award with this dramatic necklace using CRYSTALLIZED™-Swarovski elements and Beadalon silver plated wire.
Happy Haunting Collage Lorilyn Hurley of the Dream Life creates this collage filled with vintage goodness and an oh-so-risque flying witch!
Halloween Ephemera Collage Kris Tuey a.k.a. the Collage Contessa shares her artful wall hanging filled with all kinds of whimsical Halloween goodness.
If you'd like to participate, please read more about it here. It's open to all bloggers out there who want to join in! So join back here next Tuesday for another helping of inspired ideas!
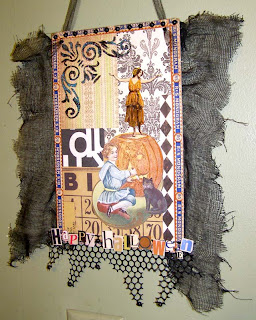
Halloween Project - Sign
I was invited by a Twitter friend, SwellDesigner, to participate in a weekly consortium of Halloween art. Not being a big halloween decorator (my kids are lucky to get their pumpkins carved by the time we walk out the door for trick-or-treating), I thought this would be a fun way to come up with a couple pieces I can use year after year!
This week I figured I'd start with a sign for my door. Granted, no one really comes to my door but the grouchy mailman who hates me, but you never know. Maybe it will brighten HIS day! lol I've added a quick tutorial if you feel like following along. If you make something with these instructions, let me know! I'd love to see other examples!
Happy Halloween Sign
Supplies:
Cigar box lid
paper scraps
vintage images
jewels, sequins or 1/2 beads (dots?)
glitter glue
letter stickers
colored pencils
sequin waste
glittery netting fabric
black cheesecloth
scroll-ish corner stamp
Aqua & Black glitters
Stazon Ink Pad (permanent)
& my newest love: Sakura Quickie Glue Pen
1 - Cut off the lid from the box. Save the rest of the box for a future project.
2 - Collage with paper scraps on the lid. I left the edge cigar tape/stickers visable.
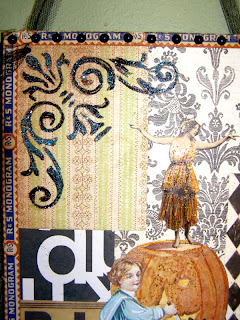
3 - Stamp with the scroll-ish corner stamp in the upper left using permanent ink.
4 - Using the Glue Pen, run over the stamped image with the glue.
5 - Random add both glitters to the stamped image. Tap off excess.
6 - Cut out 2 vintage images (I used the pumpkin one from a vintage postcard, and the fairy girl from AlteredPages, sheet 'Just A Little Frisky'. Attach to the lower right corner.
7 - I then colored the pumpkin and fairy's dress with orange colored pencil for added color. Add glitter glue over the pumpkin and dress too.
8 - Cut a piece of cheesecloth the size of the cigar box, maybe a bit longer. Cut the piece in 1/2 again and glue to the left/right sides of the box (on the back.) They should just flow.
9 - Cut a piece of sequin waste the width of the bottom of the lid. Tear it randomly. Attach to the bottom and using a bit of glue, swipe across the sequin waste and then shake on the excess glitter you have.
10 - Using letter stickers, spell out 'Happy Halloween' along the bottom of the box, at the top of the sequin waste.
11 - Using a dremel tool or awl, punch holes in the top corners and then thread though a long strip of black netting. Tie knots on the front of the holes.
12 - Final touch. Glue sequins, jewels or 1/2 beads to the top of the box as well as on each pointed part of the sequin waste.