Wednesday, March 31, 2010

Colorful Obsession


I've been taken over by the crochet bug this week. Maybe it's just my time. I tried 2 years ago to crochet but each thing I worked on seemed too tight, too complicated. I did manage to make about 20 granny squares (all different sizes) and they still sit in a bag somewhere.

This week, when the teen decided to try crochet again, to make a headband for my niece, I thought I might try again as well. I had purchased all this wool/acrylic blend yarn a couple years ago and it has been sitting idle in my studio. This time I was going to CONQUER CROCHET!


First, I started with a generic pattern: Colorful Windchime Afghan

Next I went looking for youtube videos to guide me along. Let me tell you about youtube. They have everything and I'm so grateful that people out in the world are willing to share videos on things as simple as a slipknot! I could not for the life of me, remember how.

Youtube Videos I used:

Interesting Youtubes I found but haven't used yet:
How To Crochet an Intricate Flower (for crazy crocheters w/patience)


Back to the pattern, armed with my new knowledge... Of course, being who I am, I changed things up almost immediately. First off, I was using the Wool-Ease Thick & Quick yarn so there was no way I would be wanting to do as many stitches as they say for the length. SO I cut that down to about 150 (it's about 6 feet long.)  Then, I decided after the first stripe of color used up 1 1/3 balls of yarn, I'd continue on and change colors after a ball was completed. This means I will have areas where it doesn't look like full stripes. More like a scraps afghan. I like it! I'll add another full stripe on the other side to finish it off well. I pretty much quit using the pattern after the first stripe. lol I do plan to go back and do it correctly another time.


Changes I'd make next time, now that I know more:
Use at least a triple crochet to make the rows wider.
Also, use a BIGGER needle. I used a K and this makes for a tighter/stiffer blanket.
Follow the pattern more closely.
Not grip the needle so tight that I get hand cramps (this is a must for carpal tunnel sufferers like me. I had to relearn how to hold the needle and project so that my little fingers weren't gripping for dear life and then causing pain. They have those rubber grip thingies, like you use on pencils? They have them for needles. I need to get one.)


On the upside though, because of the thick yarn, it's going to be one of those heavy afghans. The one you always reach for on cold nights to wrap your tootsies in and cozy up to your honey to watch a movie.


I still have many more rows to go, but I'm having fun! Right now it's become an obsession. I strive to finish off a whole ball each day (that makes about 4 1/2 rows of one color.) Monday I went overboard with my enthusiasm and used up 2 1/2. Tuesday was only 1 1/2 (I'm trying to cut back. :)) I started on Sunday night. I am hoping to be done next week sometime. I can't wait to use it!

Sunday, March 21, 2010

Saturday, March 20, 2010

Ahhh, spring, where art thou??


And the sweet rug
of spring bloom
has been ripped
out from under
our warming toes...

By the harrowing wind
flinging icy daggers
and petals of
whispering white snow.


Between Friday daytime, and Saturday evening, the temperature was projected to drop 65 degrees. Friday was the first 'real' spring day we've had. 68 degrees out in most parts of Kansas City. The little one dragged her blankets, snacks and schoolwork out into the yard for a day of yardschool (as opposed to 'home'school). I had shoes on WITH NO SOCKS! The teen was reading with the windows open! We were all set for spring! And then...


duhn duhn duhn duhn (scary music inserted here...)


The awful weather man said a cold snap was coming along with bitter cold and 5-6 inches of snow. As I sit typing this (middle of the night, Friday night), I can hear the sleet and a blanket of 1" of snow covers my pretty grass that was just discovering a new palette.

Ahhh, spring, where art thou??


I couldn't stand it, I had to create my own springish colors. I joined The Artistic Mother Flickr group of people working their way through the projects in this book (list of participants on this blog, right column.) It's such a good book about inserting small pockets of art time into your busy days as mothers, worker bees and wives. 


The first project was to get yourself prepared for the next projects and that started with painted papers. Well, you know I love to paint my scraps as evidenced here, here and here. But I'm following the directions to do papers, from the book. I chose scraps, book pages, mail, old homeschool schoolwork, a soda cardboard box and covers to a watercolor pad. Stuff I was throwing away anyway. 


I gesso'd them. Okay, truthfully. My gesso is so old, when I went to open it I was overwhelmed by the yucky fumes. I think it's safe to say it's 'turned', like milk... So I chucked it and used a thinner white acrylic paint. Works just the same. I will tell you, when you're going to do the next step of painting over with color, it's better painting over gesso'd papers. It makes the colors brighter and the paint doesn't seep into the paper giving it that 'wet' look.


And, since I was lazy and didn't want to get out the acrylics when I had my trusty fluid acrylics sitting on the table, I just used those. You know me, I'm a rule breaker, risk taker, dream maker!! 


Then I pulled out all sorts of stamps. I tend to lean towards background stamps. I like that they cover more area of the paper. Doesn't have to be perfect as all of this will be torn up and used in subsequent projects.


Now that they're all done and drying, I'm off to bed to watch the new episode of Flash Forward. Looks like a good'n. Have a wonderful weekend!


(P.S. You can see The Artistic Mother author's painted papers & instructions here: Background Papers.)

Tuesday, March 16, 2010

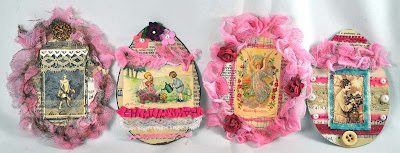
Vintage Easter Eggs Tutorial


Documenting a project as I go along has proven to be addicting. Not that my photos are the best. Still learning about my new camera but I'm having fun! This tutorial should put you in the mood for Easter. I know, tomorrow is St. Patrick's Day. I don't do much art for Pattie's Day. If you did some, I'd love to see, so share!


I started with mat board. One of my 'best ever' garage sale purchases was 2 huge rubbermaid tubs full of mat board pieces for $4. I know DH wondered what in the world I was going to do with all of that but I've used it for years now and it shows no sign of depleting! Anyway, cut 4 egg shapes. Mine are about 3 1/4" x 4 3/4". I used an exacto knife for this. It's the easiest way.


Cover the front of all the eggs with various scraps of dictionary paper, vintage sheet music, receipts, foreign text book pages and more. The usual vintage supplies. If you want, at this stage you could ink the edges with a brown ink pad.


Here's where the fun part comes in. Do you have cheesecloth in white? I have tons of this stuff. I must have kept buying it, thinking I didn't have any and voila! Now I have 5 packages. lol Anyway, take the folded pack, unfold a bit. Find the edge and cutting through all layers, cut off about 1" wide strip. Doesn't have to be perfect.


Take the cut piece, open up until you have a pile of strips. Set your sewing machine on little stitches and push the cheesecloth through the sewing machine with 2 fingers. Cheesecloth is dainty so it kind of takes 2 fingers to direct it. If you get a good rhythm of pushing through you'll get lots of ruffling happening. I thought about doing the ruffling the traditional way of big stitches and then pulling the threads tight to ruffle but knowing cheesecloth, it would have just ripped holes in the cloth. 


When you're done and have a nice long strand (I cut two 1" strips and sewed them together), lay the strand out on scrap paper. 


Spray with watered down acrylic paint or glimmer mist. I made some of my own glimmer mist; I'll share that recipe sometime. I flipped the strands over to make sure color was on both sides.


Hang it up to dry somewhere. I did hit it with my heat gun for just a bit before hanging. It does make the cheesecloth shrink up in some spots so if you don't want that, don't heat it.


At this point I just took my egg shapes and added bits of lace, trim, ric rac, lines made with watercolor crayons (Caran d'ache), black pen and glitter glue. I glued on flowers, and pearls. I also adhered images from Altered Pages collage sheets. You can buy an Easter Egg kit now from the Altered Pages store.


When the cheesecloth trim was dry I glued it around a couple of the eggs and across the others in a stripe. You can also ink the cheesecloth with brown ink for a vintage look.  On one egg I sewed the image to a fabric scrap. Just lots of little touches.


The last step I did was make a makeshift stand for my egg. I'm going to work on making something more permanent as this one is taped to the back but I like it right now. The egg looks so cute standing up. Wouldn't this make a great Easter gift? A few of the eggs are heading to my Etsy Store  today, after lunch.


For the stand, I took an 8-9" piece of wrapped wire. I rolled up the ends of the wire, leaving about 5-6" of unrolled wire inbetween. I formed it into a square U shape. I then took a 3" piece of wire and twisted it to the arms of the stand to brace it. I taped it to the back of the egg to help it stand up.


I hope you have fun reading and possibly making these eggs from this tutorial. Feel free to share it on your blog. I'm off to blog surf for more Easter ideas! Ta-ta for now.

P.S. I forgot to mention, I started a new PAGE (see top right column.) I didn't know blogger had this capability until last week. Anyway, you can find all the tutorials I've shared, and freebies posted on that page. As I do more, I'll add them there so they're easily found. 

Monday, March 15, 2010

Where Hubby's Paycheck Goes, AKA: Thrifty Finds


I keep meaning to share the things I've thrifted recently but haven't taken a moment until now. DD and I went out last weekend or was it the weekend before? Anyway, I picked up this box of old cardstock type letters and numbers for a song. I collect old and different tins for keeping art supplies in.This large tin is beautiful colors. I think it advertises capers? I didn't know Heinz made such a thing. The funky sheer fabric I pick up this weekend at the thrift store. The teen has been wanting to decorate her bedroom in a bohemian style, similar to the Bohemian Chic style in The Well Dressed Home book so we've been gathering fabrics and sheets for the look. I plan to snip off a bit of this fabric before she runs off with it. I love collecting aprons and have 4 or 5 of these terrycloth styles.


These candleholders are from India (aka: probably Pier 1) and still had their tags on them. I think I might use 2 for our mantel and another for an art project. DH says they're already painted nicely so why would I want to change that? You never know... The sheer 'fabric' is actually a skirt. Yes, I bought it just for the fabric. You can never have too many sheers OR polka dots!


See? I love aprons. Here are two more vintage aprons I picked up at GoodJuJu. The flower one is a favorite. It has a top bib that you pin to your shirt. So pretty.


I loved this little postcard and yes the pink is just that bright. It's just sitting there waiting for me to write something pretty in the pink box. Apparently there is a story behind the postcards the lady had for sale. An older lady had saved all the postcards that her mother and father had sent each other over the years, over a 70 year period or something. So having the whole collection of them it chronicled their whole life together. What a wonderful legacy... Do you save the emails and texts from your beloved? I wonder what we'll leave behind for our children to recount our history?


I just couldn't leave this card behind. This is so adorable. I want to frame it and put it in my bedroom. Can't you tell he just loves her and wants to impress her?! And she's so impressed too! The green fabric you see in the background are curtain toppers. Vintage style fabric but it might be Martha Stewart curtains?  I think I'm going to use it to make tote bags and other things and sew on experiments made with ruffling things like Pink Picket Fence.


I'm a sucker for anything embroidered and I have a whole laundry basket full of my 'collection' to prove it! I really  need to do something with all the pieces I have, someday.


This was my favorite find of the weekend. Yes, this stained up, funky green hot plate. I've been wanting to experiment with encaustic wax painting but was unwilling to shell out the $600+ needed to have a whole kit. Now I can use this and little CLEANED OUT tuna cans to hold my melting wax and paints. And voila! I'm in business! Art can be cheap and on the fly!


These candleholders have a deadline to living up to their potential. Apparently the teen likes them as well and has given me 6 months to use them or lose them. I say I bought them, I can hoard them as long as I want but she begs to differ.


I love the detail on the medallion shaped bottoms and am hoping to use it as a base for an assemblage or a decoration on an altered journal. Not sure which. Spring is almost here and the rounds of garage sales will begin. Can't wait to see what turns up!

Wednesday, March 10, 2010

She Shall Be Praised

There is a wonderful feeling of satisfaction in taking something shiny and new and distressing it so much that it looks like it's been that way for years. The teen and I were recently at Lowes and they have a few racks in the middle of the lane with clearance items.


I found a whole box of Pergo floor samples for 8 cents a piece! Can't pass up pretty little wood pieces for so cheap! Don't you just love clearance bins? The wood pieces hold paint really well. I also picked up a quart of light aqua paint in the paint section's clearance for $2. Nothing makes my heart sing faster than sales on things I can use in art!


I love old lace. Okay, maybe we should call it a 'healthy' obsession  for it. I look for lace anytime I'm at a garage sale, antique mall or thrift store. When friends go out garage sale shopping, I tell them 'if you see lace, let me know.' The teen is heading to France and Italy in April and she already has been instructed to bring home a bit of french lace.


It's not as if I don't have enough of it but when I see more, I can't help but touch it. It feels soft and old, well loved. I think I like the thought that someone hand-tatted the lace; it originally was attached to a little girl's favorite dress or a new bride's honeymoon nightgown. It has memories. I wish the lace could tell me what it knows.


For the Glory of Children piece I played around with paint, stains, old lace scraps, a button card and a verse from a 1900's bible. Proverbs 17:6; Children's children are the crown of old men; and the glory of children are their fathers. The image is from a Red Lead collage sheet.


She Shall Be Praised was a fun piece to make. It just screamed for beads. After layering several vintage laces, lace curtain pieces and pink ribbon, a pretty Altered Pages image of a lady admiring her profile was sewn on and the whole ensemble attached to the wood piece with glue and mini nails. For a final touch, a spritz of vintage pink netting was tucked up under the Proverbs 31:30 verse: Favour is deceitful, and beauty is vain; but a woman that feareth the Lord, she shall be praised. 


Your Faith is one of my favorites. Oh heck, they're all my favorites. Image is from Altered Pages as well. This piece is a layering of old laces, an aqua scrap from a 1960's party dress, a silver scrap from a fancy 1960's dress and more buttons that you can shake a stick at. One fun little detail is a silver and pearl teardrop earring dangling near the bottom. Verse from 1 Corinthians 2: 4,5: That your faith should not stand in the wisdom of men, but in the power of God.


All of the pieces have a strip of 'diamonds' from an old necklace, near the top of the wood piece. The hanger loop is made of metal stripping painted to look rusted. All have an underlayering of distressed wood. Ready for hanging!


They're all listed in my Etsy shop. I can make a few custom pieces so if you have a favorite verse, let me know and I'll make a one of a kind piece for you!