Friday, December 14, 2012

Poppy Paintings


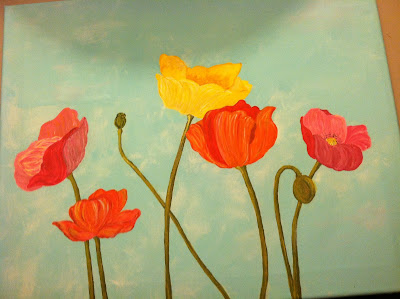
My parents went to France, England, Germany and I think Belgium this past spring. The pictures they took were stunning but the poppy pictures were my favorite. I have a pic my mom took, saved as the background on our desktop. The colors called to me and I had to paint it!


This is a watercolor I worked on from the original picture you see there on the desktop. It's more muted but I liked it. Not real good at the rock underneath...


Then I decided to try an acrylic painting. I picked out the flowers I like the best from the original painting, plus a few shaped ones from the internet. This is the beginning.

 
A bit of background layering on the flowers...


Here's a closeup of some of the flowers. I think the orange/red ones are my favs to do.


The flowers are finished how I like them. I need to add a sentiment to the top somewhere. Leaning towards the verse were it says even the flowers of the field are taken care of by God, I'm paraphrasing but something like that would be good...


Wednesday, December 12, 2012

Felt Flower & Chevrons Canvas

I went to a wedding last month of two adorable people. I remember being adorable, once... Ahhh, so long ago. Been married almost 25 years myself. My how time flies... Anyhoo, I digress!
 
Pinterest has become my new best friend and I saw a felty flower on a pillow or something and I thought, surely I can make something like that?! But I thought it might be better for a canvas. Plus I had just picked up 12x12" canvases that were screaming for paint. I obliged.
 

Okay, before I try to explain, this was not an exact science. When have you ever known me to do something 'exactly'? Anyway. I've been wanting to do something with chevrons or zigzags as they called them when I was younger. (I have plans to make curtains with them, in January, so stay tuned for that!) I sorta marked off every 2" horizontally and then every 1 1/2"-2" vertically. All by trial and error I assure you. I used light pencil for markings and blue painters tape for paint lines. I did do them all the way over the edge of the canvas for continuity.


This is the felt flower I made for the middle of the canvas. I found a tutorial here that I loosely followed.  i will say, for a 12x12" canvas, those size circles were too big. I cut mine 3" and 2" and had probably 1/2 left over. I also just cut a square of fabric to sew the circles to and then after I was done, I cut away the square, about 1/2" from the first sewn row.  Real simple.


My friend's wedding colors were light grey and mustard. I couldn't decide whether to do light or darker grey so I sampled both and showed family. They told me I should go with both colors so I did. I like the way it came out although it was different in my brain initially.


Since weddings are special, I had to have a special button for the middle of my flower. This is one of my great grandma's buttons. She was married for probably 50 years until my great grandpa died. She outlived both her boys and graced our lives for 103 years. It'd say this is a lucky button. More accurately, a button from a woman who had a Christian life full of blessing.

 
After the canvas was dry I pulled all the tape off. Sure, there were a few minor places where the paint sneaked under the tape. I just took out a tiny paintbrush and touched it up. Then, as seen above, I sewed the flower to the canvas.


 Here's a look at the finished product. I think it came out awesome if I do say so myself! Now I want a huge one, with double the petals, for my own wall! Can't wait to make another one!
 
 
In case you were wondering how I wrapped it up for the wedding... Mom said it was too pretty to stick in a box so I just wrapped it in tulle, added a homemade tag and attached it with a hat pin. The bride sent a thank you card saying they had already hung it in their bedroom. Always nice to know when someone uses your gift!

Monday, December 10, 2012

Lost My Saddle...

** NOTE: I found this blog post saved as a draft, never posted, from March. It's still good, a testament to where I've been and how God is still faithful, so I'm sharing it... **


March 13, 2012.   It's been a long time since paint and pens and pastels and crayons were clutched in my hands. Many factors plus my own feelings have keep me from continuing art. A car accident and pain, hubby job issues, teenagers, homeschooling and plain ole' laziness and uninspiredness (is that a word?!) I can't even say I'm 'back in the saddle' because I've misplaced it.


A new medicine the doctor has put me on for pain is messing with my normalness. It makes me feel all wonky and lethargic and down. Don't like it, not going to take it anymore. But because of it, last night I was having issues, anger, depression, irritability. Couldn't really deal with anyone. Basement studio, well lets just say a tornado would have improved it... can't work down there. I knew I needed to do something to get rid of this feeling, so I tore up a bag, stole (with permission) the little's ones plain markers, crayons and pencils and spilled my guts. Let me tell you, that's therapeutic!  Then, because I wanted to keep the words as reminders of where I can get to and where God has to pull me out of, I began to art them up. Here is the result.


I hesitate to use the word 'Prayer flags', like the Tibetian flags you see hanging in recent pictures over the Himalayas, used in Buddaism. But for me, they are prayers I'm sending up to God, for a little help this week. He knows all.  I saw in the recent Cloth Paper Scissors that have a whole article on Prayer Flags so it must be a 'thing'... hmmm... I'm going to attach them to one another with some kind of ribbon and either hang vertical one under the other, or across like a garland. We'll see.

Scripture used:
Psalm 42:5 - Why, my soul are you downcast? Why so disturbed within me? Put your hope in God, for I will yet praise him, my Savior and my God. 

I Chronicles 4:10 - Let your hand be with me and keep me from harm so that I will be free from pain.

These were just the bottom pieces of the big bag. The sides plus handles are folded up while an idea for them is percolating...


Little one came in when I was trying to write, all nosy and such and I was short with her. But inspiration (and I'm sure God's prompting) struck and instead of having her go away mad, I grabbed a scrap and made a flag for her, as a 'sorry'. Cheered her right up, me too and she used a straw to make it into a flag she put in her room. God is good.
 

Thursday, December 06, 2012

Felty Garland, Ornaments & Transparency Envelopes

Lately I've been enamored with Pinterest. I'm sure you are as well. Its a wonderful place to store pictures of ideas you want to attempt one day. It's kind of like when I first got married I would pull every idea I liked out of a magazine and file it into a 3 ring binder for future reference. 

Recently I've been working on a few ideas I 'stole' from there, Christmas ideas. Tired of the normal tree, we've redecorated ours with only handmade and special ornaments as well as birds. I love birds, owls and such. The 'vibe' was different so it called for white lights and new garland. I found a link to this post on Pinterest. Twisted Felt Garland. I made ours easily in a couple hours just chatting with friends.


I used a couple shades of pinks and aquas. Each strand was about 1-2 yard and I sewed all of them together at the ends to put on the tree. You can see it on the tree  below (before I put on ornaments.)


Speaking of ornaments, that leads me to my next 'stolen' Pinterest idea. I get together with homeschool/crafty friends every month for dinner. December, however, is special. We bring ornaments to share with each other. Just little gifties as a culmination of the year as friends. This year I took this Christmas tree idea and ran away with it.


I went with the same colors I used for the garland, some of my favorite color combos lately. 


I cut random elongated tear drop shapes. I just freehanded these, no pattern. They're about 5" long.


I cut out tree shapes. Basically wiggly wobbly thin triangles. Again, no pattern. I also cut a strip of green and just cut of rectangles for tree trunks.


Because there are two layers, I did all the work on the top layer so my knots and such would be inside the ornament. 


I used a wool thick thread for stitching. It's similar to an embroidery floss so either will work. Just make sure to have a needle on hand that accommodates the thickness of the thread. I had to hunt far and wide through my things! A tapestry needle would work as well. I used I guess a straightened up whip stitch, very simple.


Next I free hand cut a paper star. Nothing fancy.  Just make it small enough to fit on the ornament top which is thinner.I sewed it on with a larger bead.


My favorite part has arrived! The gilding! I sewed beads on the tree for ornaments. Too bad they can't light up. I'm sure there's a product out there what would! hehe


Here's the finished ornaments. 


I sewed stamped tags onto the back (courtesy of Stampin' Up) with beads and then I stitched the front piece to the back piece. I included a 7-8" ribbon, folded in half at the top for the hanger. 

---------------------------------------------------

And seeing as these are a gift, I had to have a gift bag. Last night I found myself muttering to... myself, "Couldn't go with normal gift bag, stick em' in and be done. NO! You have to sew through TRANSPARENCIES!" This was the complaining after I had misplaced my NEW leather thimble which helps with pushing needles through transparencies! See below.


I had these blue transparencies from... probably some garage sale. . I found some stamped 'NOEL' words, some round pics from an image sheet, I think from Altered Pages and 2 vintage paper coasters. I also used ledger paper and more of that wool thread/embroidery floss.


I folded a transparency in half and stitched with a needle and the wool thread. If you only have clear transparencies, throw some india ink or fluid acrylics on one side and add color that way!


I cut the ledger paper to fit the opening. On some I glued a paper coaster, on others I cut a larger circle of cardstock and added my round images. Noel went below, some pen scratching and then my sentiment! easy peasy.


The ornaments slip easily inside the ledger 'card' and the whole thing was slipped inside the 'envelope'.


Finally, I poked holes on the top edge and finished off the threads. I had initially sewed top right down, left and up to top left, leaving a tail on the right and another on the left. So after they were full I stitched them closed.  Why be ordinary (with your envelope) when you can be extraordinary?! (I think I heard that on Food Network! lol) Fun to make!